Category Archives: Art Advice
Make a basic film/reel DVD with Adobe Encore
If you’re an animation student or an independent filmmaker, you may want to put together a DVD with your reels and films to send out professionally. This tutorial will familiarize you with the basics of Encore, so you can put a selection of movies on a DVD with a custom menu.
Intuos Pen: Drawing More Comfortably

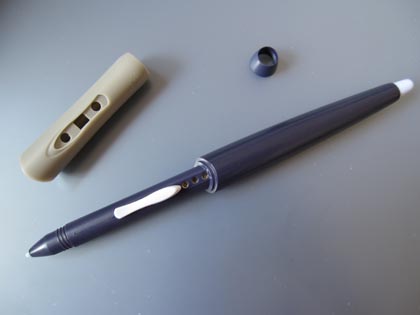
If I’m drawing or animating digitally for an extended period of time, generally my wrist starts to hurt because the barrel of the Intuos pen is so thick. I’m not sure how common this trick is, but it’s worth sharing because it might spare you a pain in the wrist.
This goes for all pens from Intuos 2 on up to Intuos 4– I believe the Cintiq pens are about identical to the I3’s/I4’s.
- Unscrew the tapered tip, right below the gel grip.
- Pop off the clicky button by gently lifting the edge of one side; the whole button should pop off.
- Slide off the grip.
- (Optional)– pop the button back in (seen here). It will stick out, but you can keep it out of your way depending on how you hold the pen.
Now the pen’s barrel is roughly the same thickness of an ordinary pen. Huzzah!
Oil Pastel Blending Secret
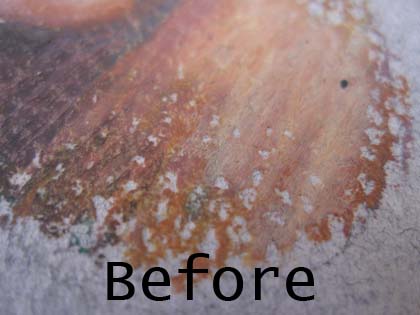
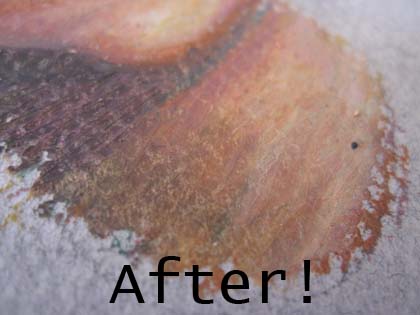
Sometimes when working with oil pastel on a toothy paper, you’ve got delicate color shifts that unfortunately don’t sink into the paper’s tooth. Generally applying a lot more oil pastel would be the solution; but that can sometimes ruin the original colors that were laid down.
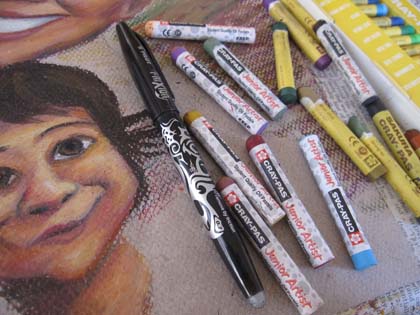
Fear no more! Pilot’s FriXion erasable pens have rubber “erasers” (no more than a little rubber nub). These blend oil pastel brilliantly! The rubber nub for erasing (it’s called FriXion because it removes the ink via friction) never seems to wear down. Keep some newspaper handy so you can clean it off from color to color.


Dearest Pilot FriXion magic oil pastel blender, you’re now part of my art arsenal.

Make your own Hanging Zoetrope!
So you’ve always liked animation and you always thought zoetropes were cool. Perhaps you wanted to make your own zoetrope but felt a little lazy and didn’t quite have the motivation to go dig a motor out of some old kid’s toy? Or maybe you never quite knew how to go about it before.
Well, boys and girls, ladies and gentlemen, I now bestow upon you my super-simple, super-cheap, relatively-quick instructions for a zoetrope made out of household goods!
Cheap animation disc desk instructions!
Hey all you animators that just took off for home and plan on working on your films but don’t have fancypants desks that lift up at angles! This one’s for YOU!


I figured I wanted to animate and clean up in comfort, so I scavenged around and found a backing to an 18×24″ Biggie pad that was sitting around, waiting to become useful. I came up with this contraption, which requires no more than said piece of cardboard (non-corrugated, this is really tough stuff!), a box-cutting knife, packing and duct tape (though you could probably get away with just good ol’ duct tape).

- Here’s how it works. Take the cardboard and cut strips approximately 2.5″-3″ thick strips down the long way.
- On one side of these, make a light cut into both ends, approximately the width of the packing/duct tape you’re working with. Fold the board on these light cuts; now, turn over the board and make a light cut exactly in the middle of the strip. Fold the board back on these new cuts. You should have your strips shaped as you see in the following illustration, by the massive “x2” (as you’ll make two strips like this, one for the left, and one for the right).
- Get your packing tape ready! line up the “feet” of the strips vertically with one of the long edges of the remaining part of the board that you originally cut the strips from. Tape the feet on flat. Now, with the strips bent in an upside-down V, place your disc on them and figure out a distance (with the board pushed to the edge of a table against a wall you plan on working against) that you’re happy with your disc being propped up at. Translation: figure out the angle that you want the strips to be bent at; an angle that you’re comfortable with. Once you’re happy with the angle, make sure the remaining “feet” are about lined up and tape them in place… when you tape the feet, tape them on the front of the board and wrap the tape to the back. (Hence the overhang in the illustration).
- Now, get a little sliver of duct tape and fold about half an inch of it over itself and tape it down lined up with the start of the angle of the bent strips. This piece of duct tape will hold your disc in place.

That should be it! You’ll work with the entire “contraption” pushed up against a wall so it doesn’t slip away, though I’m sure you could tape it down to a desk instead. There’s plenty of room for a desk lamp to be used as a backlight as well, which also helps weight down the entire setup.
Improve on it as you wish; this is the first thing that popped into my head and it’s working so far (though I’m only on day 1 with it!) Feel free to post comments and suggestions– I hope the instructions are clear!
Algebra

So it dawned on me that life drawing–fine art, in general– is nothing more than algebra.
“But Tahnee! That’s ART, not MATH!” you exclaim.
True, dear reader, in the academic sense– but here’s how I like to look at this. I may be a lousy mathematician when it comes to numbers, but not when it comes to visual algebra.
X = Y.
You’re trying to make both sides equal. Look at this equation in a life drawing session. X = the paper in front of the artist, Y = the model on the stage. The artist is trying to make the page in front of them resemble that model on the stage; trying to make it equal what they’re seeing. When the page’s drawing = the model, or when X = Y, the equation is balanced.
I now declare myself a proficient algebratician.
How to SPOT an ANIMATOR!

1. Greasy, unwashed hair
2. Bloodshot eyes (that see DOUBLE!)
3. Pencil behind ear
4. Gaunt, sunken-in, mis-fed, pasty-white cheeks
5. Glasses
6. Hunched back
7. Same clothes for the past 2+ days
8. BLANKET
9. Carpal-Tunnel-inflicted hand (quivering with animation)
Web Tips: Making an Animated Favicon
So we’ve all come to know those little icons by a website’s browser tab or bookmark link as Favicons. They’re 16×16-pixel identifiers for a site, and are sometimes initials, the main logo or a bright, eye-catching visual element by which we’ll remember the website.
Art Advice: Scanning and mending large art
Scanners. They’re our amazing link between the traditional and digital world. Yet, we have a slight issue when we’ve created a piece that’s just a little too large to scan in. Should you scan in just a portion and leave that to your digital workings? It would most certainly be nice to get a full-detail version into Photoshop with 300dpi, though…. and digitally photographing artwork often ends with blurry, washed-out results. Never fear! I now bring to you the ultimate scanning and mending tutorial.

