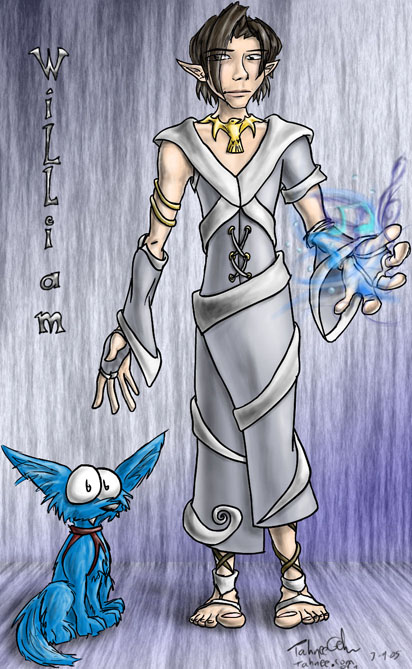

How to Paint
This is a tutorial I threw together for how to make realistic (yet still cartoony) images. I used Macromedia Flash MX and Photoshop CS; you could probably go with any Flash or vector-based program and perhaps any painting program, too. I also use a Wacom Intuos2 tablet and will mention painting settings for tablets. You can still attempt it if you're on a mouse, though. ;)
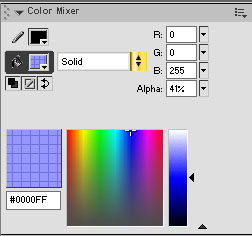
First, open Flash. Select the paintbrush and make the ink blue and set the alpha (opacity) to 41% or somewhere thereabouts. Set the pen's pressure sensitivity on and select a somewhat thin brush (I use the third from the top).
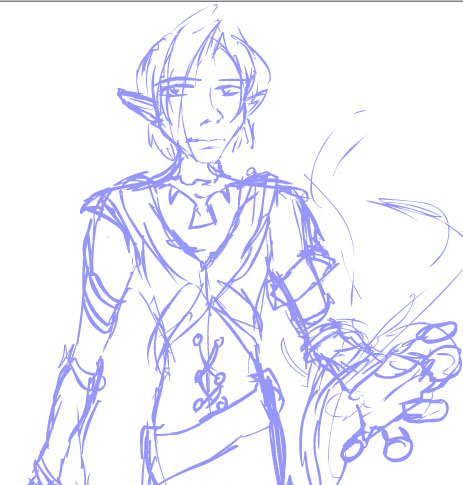
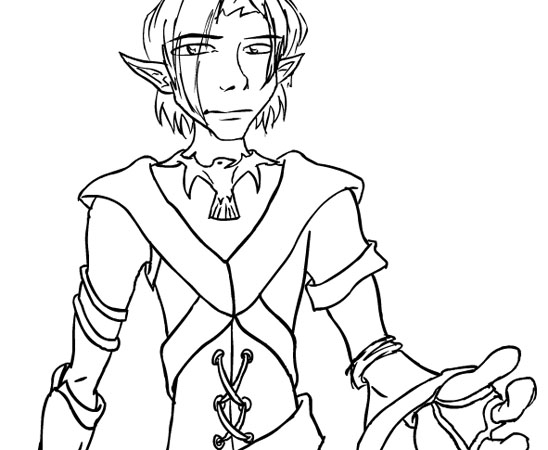
Next, hide the Timeline, Properties and AS boxes-- you want as much drawing space as possible. Sketch out your character/drawing.
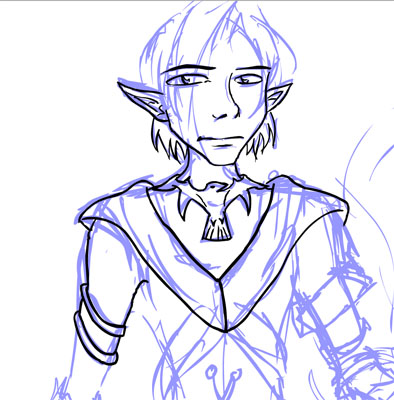
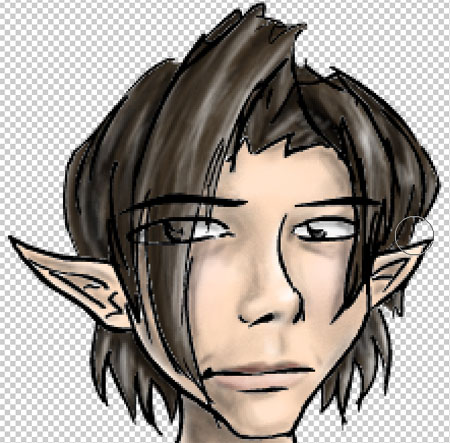
Once you're done with that, open up your timeline and lock the current layer. Create a new layer on top of this one. You can name it "ink" just to keep track. Change your paint color to black; keep the paintbrush options (thickness, etc) the same. Zoom in and outline ("ink") your drawing.
Once you're done inking and you're happy with it, (feel free to make any changes now, because it'll be tough to get nice crisp lines in Photoshop), open up the timeline and delete the sketch layer. Go File>Export Image... and then export it as a .PNG. I used 150 DPI (dots [pixels] per inch), guarantying high-quality, but you can change that number. Make sure that you have Smooth and Transparent Background turned on/checked. (The transparent background is important!) Once it's done exporting, hit CTRL+Z or Edit>Undo to put the sketch layer back on. (We deleted it so it wouldn't show up in the .PNG.) Save your Flash file for future reference.
Launch
Photoshop. In your layers palette, drag the current layer down to the "new
layer" icon (![]() )
to create a copy. We'll be using this technique a lot later.
)
to create a copy. We'll be using this technique a lot later.
In fact, make another copy of that layer. Name the topmost layer "ink". Leave this one alone. Now, select the layer that's sandwiched between the Ink and the very bottom layer.
Now, choose a skin tone for your character. Just the natural color-- not tinted or shaded. Set this as your foreground color.
Create a new document in PS; it doesn't have to be big in size. We'll keep this aside as your color palette for colors that you choose for this project. Place it so that your painting will be able to be fully viewed, but this will peek out from behind just a little. Paint a solid circle (scribble, square, I don't care!) of the skin tone on an easy to reach spot of this new document, then go back to your current painting project. You're probably confused, here's a screen shot to help you out:

I hope this makes sense-- basically you're hiding this new "palette" behind your current project, but in a visible and accessible place. (Sorry about the sloppy writing!)
Now, go back to your main project, to that sandwiched layer in the middle of all your layers-- name it "skin". Use the paint bucket (G) and double-click in the areas that have skin. We're double-clicking because it fills in the areas completely, not leaving any partially-visible black remnants from the general ink. If some areas aren't covered by the paint bucket, use the paintbrush to fill them in. Stay inside of the lines as much as possible; you can paint on the lines, just as long as you don't go over into another color area (like clothes).
Hold
down CTRL and click on the Skin layer once you're done coloring every skin tone.
Add a layer mask by clicking on (![]() ),
which is found at the bottom of your Layers palette. Now, hold down CTRL and
hit D to deselect the mask; Now, click on the layer content (the layer Skin
with the ink on it) and NOT the mask (black and white thingee).
),
which is found at the bottom of your Layers palette. Now, hold down CTRL and
hit D to deselect the mask; Now, click on the layer content (the layer Skin
with the ink on it) and NOT the mask (black and white thingee).
You just now set up a barrier so that anything that you paint on the Skin layer will remain inside of the skin tones; you can color outside of the lines as much as you want, and it'll never show (unless you modify the mask, which you can paint on by using black and white, in case you forgot to add a spot). This gives your work a clean "worked inside the lines" touch, which accentuates the inked lines, adding a cartoonish style (somewhat...)
Now, we'll get to shade! *cheering* Here's where I'll start talking in Tablet. Pull down your Brushes Palette and stretch it to the maximum height possible (so you can see as many brushes at once).
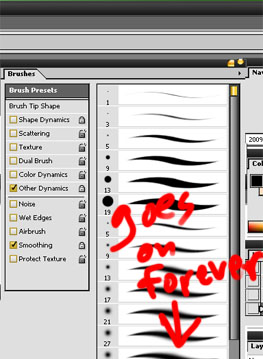
Now for some Paint Brush Settings!
Other Dynamics: Opacity: pen pressure; Flow: pen pressure
Smoothing:
checked
Now, paint/shade your heart out! I recommend tinting first (that's "shading"
with white; just painting in the light/lit up areas). Going lightly with the
pen will lightly shade; heavier will bring out the shading color more. Select
a different thickness of brush from the Brushes Palette. After you're done tinting,
then use black to shade with. Have fun experimenting with other colors, too,
if you want... Work zoomed in, too. Makes life easier. ;)

And kids, always remember to use your core shadows and reflect light! Makes things look realistic!
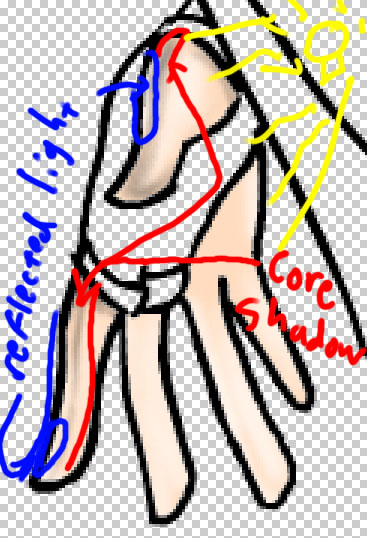
Core shadows are the darkest shades; reflected light is a little bit of the edge of the darkest shadow lit up... So any light reflecting from the ground shows up onto the darkest areas.
If you find that you've used a bit too much black and white in an area and the area turns gray, you can always refer back to the "peeking palette" and use the Eyedropper (I) to pick up that color that was the neutral, then re-paint over the gray areas and try shading them again. It takes a few tries before you get it right, so be patient!
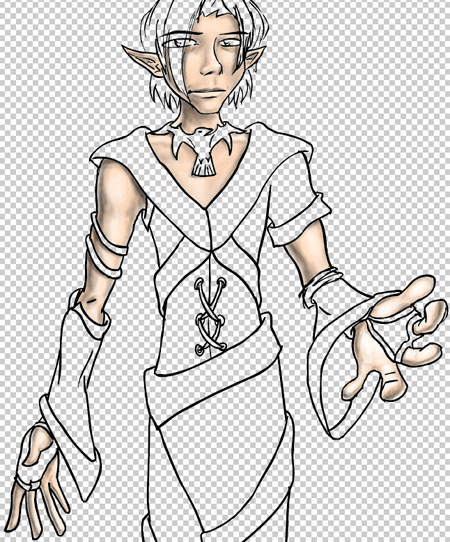
Shade and tint all the skin until you have it finished. (Yay!)
Remember
how we first made the Skin layer? We copied the very first, bottommost layer
by dragging it onto (![]() ).
Do this. Make sure this layer is sandwiched between the bottom and Ink layers;
anywhere in between is fine. If you're going to do clothes next, name it Clothes.
For this tutorial, I made two clothes layers, because there are big thick straps
on top of the material. I separated these to make coloring easier (so that I
could go over the lines without worrying about accidentally coloring in other
areas).
).
Do this. Make sure this layer is sandwiched between the bottom and Ink layers;
anywhere in between is fine. If you're going to do clothes next, name it Clothes.
For this tutorial, I made two clothes layers, because there are big thick straps
on top of the material. I separated these to make coloring easier (so that I
could go over the lines without worrying about accidentally coloring in other
areas).
With the paint bucket, color in all your neutral colors on this new layer, and always keep a copy of your neutral colors in the Peeking Palette, just for future reference. Once again, just paint a little splotch onto the palette to get the color down, then go back and make the layer mask, then color, tint, shade everything until everything's colored and shaded.
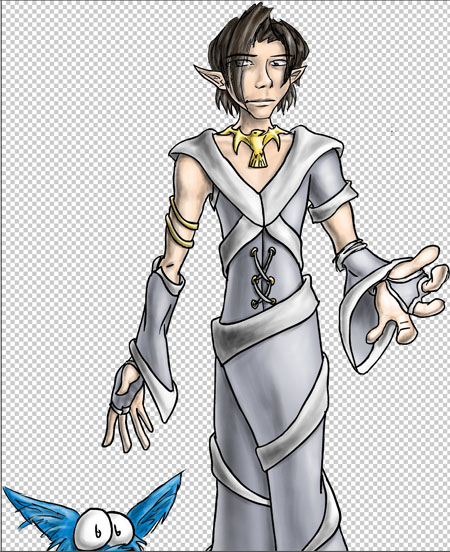
Note: for the little dog thing, I used the rectangular selection tool and selected the dog in the original ink layer, then copied and pasted, then made a series of layers-masks just like I did for the main character, and colored him in the same.
After
you're done painting everything in, you may want to add other bits of color,
like lips, cheeks, etc. Create a new layer below the Inks and on top of all
the other layers, then select the color you want it to be hued to, then lightly
go over, hinting at the color that you want it to be.
If you want to add elements such as light, magic, etc., create a new layer above your Inks layer, and add in all the magic you want. (This way, your inking lines won't get in the way of and cover your magic; that would look too bizarre). You can also add a signature, a name, whatever... And probably a background. For this background, I made a gradient, copied the layer, made it 30% and used a Fibers filter on it, then played with perspective, layers and masks to get the whole background effect, then added shadows from the characters. You don't want the background to be so busy that it takes away from the main drawing, so make it as minimal (but nice-looking) as possible. You're done!