
If you’re an animation student or an independent filmmaker, you may want to put together a DVD with your reels and films to send out professionally. This tutorial will familiarize you with the basics of Encore, so you can put a selection of movies on a DVD with a custom menu.
First, you’ll make a new project. For this example, I will be making a DVD for a selection of my recent films.

You’ll want to make sure that you’ve got NTSC selected if you’re in the United States.
I stick with the default transcode settings. We’re looking at 720×480 29.97 for our video. Don’t worry, your movie files don’t need to be rendered out at this. Encore will re-encode them as MPEG-2’s for you.
Yay, our blank canvas! In the upper-left, you’ll find a tab called Project. Click on it to activate it.
You can now either locate your movie file in its folder via Finder or Windows Explorer and drag-drop it in, or you can go File > Import as > Asset and locate your movie file(s) that way.
You can right-click on the files you dragged in and Rename them to make organization easier from here on out.

Now that we have all our video files added in (you can always add more later if you’d like), we’ll need to make Timelines for each one.
Think of a Timeline as a DVD-friendly jacket each one of your videos will need to wear.
To make a Timeline, select one of your imported films, and go Timeline > New Timeline (or ctrl/cmd + T). You should have a Timeline automatically created for the item you selected, with the video file already in. Rinse and repeat this step for the rest of your video files.
We’ll need to get to all these Timelines from a menu, which is next:
Menu > New Menu
The center display box should have a tab titled ‘Blank_Menu_720x480’ and look like a black void. Take a Timeline and drag-drop it into the blank void. You’ll get an (aesthetically unpleasing) sample button.
For now, it displays ‘Text’. If you look over to the right panel under Properties, you’ll see that this button’s name is currently ‘grainy’. Rename it to something related to whatever that Timline is (‘reel’, perhaps) to rename the button.

Repeat this process with your remaining Timelines, and arrange the buttons roughly how you think you’ll like them in the final.

Be sure to hit the titlesafing ![]() button to keep things within TV boundaries.
button to keep things within TV boundaries.
(we’ll make this a lot prettier in Photoshop!)
Once you have them visually rearranged to your liking, change each button’s Number to their visual order… So your top button is ‘1’, second button is ‘2’ and so on.

Despite the lack of appeal, let’s get the menu into proper working order so we know what we’re working with.
From the Project tab, right-click on the menu (if you’re lazy like me and haven’t renamed it, it’s still called ‘Blank_Menu_720x480’). Click ‘Set as First Play’.
Let’s be un-lazy for a moment and right-click and rename it to ‘MainMenu’ to make things simpler.
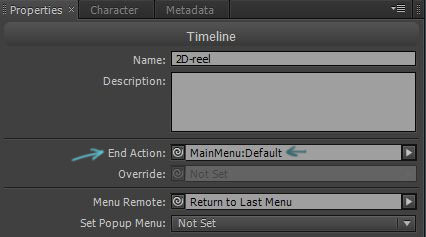
Next, visit each of your Timelines and tell them to change their end action from “Not Set” to MainMenu > Default. (You can also drag-drop the swirly, aka ‘pickwhip’, onto the MainMenu).
Your DVD should be ready to test now! Click the Preview button and take it for a spin.
![]()
I would suggest testing button navigation with your arrow keys to make sure everything’s in order (this goes back to setting button orders).
Instead of watching your videos all the way through, you can click the ‘Execute End Action’ button to make sure they link back to the Main Menu (or whatever menu you choose) properly.
![]()
Time to make our menu pretty!
Right-click anywhere on the black void of the menu and click ‘Edit in Photoshop’.
You’ll notice that the groups and layers all have very specific naming conventions. This is all Encore-DVD speak, so don’t go tweaking the layer names of the layer groups — basically anything with (+) or (=1).
First, I’m going to edit my background to have an image and some text.
Any time you save this file, you can go back to your Encore project to make sure everything’s playing nicely with the titlesafes.
Next, I’ll edit all the buttons. personally, I dislike the ‘button’ look, so I’m getting rid of that bottom button layer in each group. After updating the type and placement for each of these, I delved into editing the highlight for each one.

The (=1)highlight layer is a vector shape, so keep it as such. If you’re redoing the graphic (I suggest you do), use the shapes and pen tools to make a new vector layer to replace the old one. Rename the new vector layer the same as the original, and delete the original:


…So I’m taking my new vector shape…

…renaming it like the old one, which I delete.
At this point of editing and experimentation with button highlights, we may decide to save and go into Encore, only to find a bunch of red triangles over our buttons, and ugly results on playback:

Keep your cool! That’s because our highlights are overlapping one another back in our Photoshop file. Everything should play together nicely once you’ve gotten those all finalized.

Bear in mind that when editing things in Photoshop, that can sometimes rearrange the order of your Buttons; make sure everything’s in order before proceeding to the burning stage.
By this point, your DVD is ready to go!
Go to the Build tab and scroll down to rename your Untitled Project to something more appropos. You can also adjust DVD copying capabilities here (if you want to copy-protect it, now’s your chance; I haven’t played with this myself, so experiment away).
Click the “Check Project” button, make sure everything’s checked, then “Start”.
Hopefully nothing will list, in which case you’re ready to pop in a DVD and burn! If you do have errors, they’re likely related to Timelines that don’t have end actions or other things that aren’t linked up properly. Check them out and make sure everything’s linked; recheck your project and then Build it.

Encore will now encode all your videos, after which it’ll burn your DVD. Test it in both your computer and on a DVD player (the more platforms the better)– and there you have it! Your own DVD!
